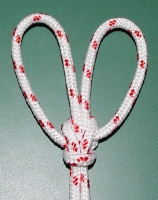
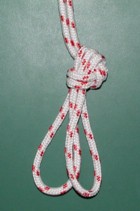
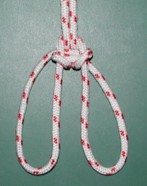
This knot creates two loops.
Ashley referred to this as a double splayed loop in the bight, and it's listed as #1100 in The Ashley Book of Knots (hence the name "ABOK #1100"). To tie this knot, start with a loose Alpine Butterfly (picture 1). In picture 1, notice that there's a tall loop sticking straight up the middle, and there are two other loops on the sides of the tall vertical loop. Bring those two loops through the tall vertical loop (picture 2). Bring the tall vertical loop toward you and down so that it lays below the rest of the knot (picture 3). Carefully dress and set the knot (picture 4).
 -1
-1
 -2
-2
 -3
-3
 -4
-4
In The Complete Rigger's Apprentice (p.59), Brion Toss says that "This knot (Figure 3-17) is a little tricky to tie, but its splayed loops make it preferable to the Bowline on the Bight for some slinging applications (ladders, pallets) and for sitting in. Either knot is good as an emergency bosun's chair."
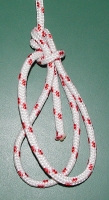
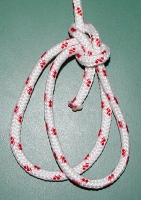
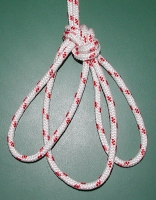
This variation of the basic Bowline creates two or more loops.
First tie a basic Bowline (picture 1) and then continue around to tie a second Bowline (picture 2). You can add as many more loops as you desire by tying more Bowlines. Dress and set the knot (picture 3).
 -1
-1
 -2
-2
 -3
-3
If you're familiar with the basic Bowline then the Birmingham Bowline is easy to remember how to tie, and it's fairly easy to tie, and it's fairly easy to dress, and it's easy to untie after it has been under a strain. Also, it's versatile because it can either be tied before the loops are put to use, or else you can pass the end of the rope around an object as you create the knot. One disadvantage of this knot is that it can't be tied in the middle of a rope (when you don't have access to the ends of the rope).
I haven't been able to find any strength ratings for this knot, but if you need to pass the rope around an object while tying a multi-loop knot then this might be a knot to consider.
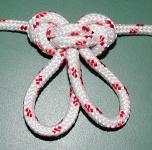
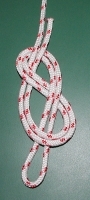
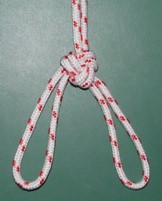
This is a double-loop variation of the basic Bowline.
To tie this knot, create a small loop in a doubled rope (similar to a basic Bowline), and bring the end of the doubled rope up through the small loop (picture 1). This creates two big loops which hang below the knot (where the basic Bowline has only one big loop). Now open up the end of the doubled rope and bring it down and around over the two main loops (picture 2), and then continue bringing it up above the small initial loop (picture 3). Dress and set the knot (picture 4). Now it looks like a Double-Knotted Bowline but with two loops instead of only one.
 -1
-1
 -2
-2
 -3
-3
 -4
-4
If you know how to tie the basic Bowline then the Bowline on the Bight is fairly easy to remember once you get the hang of it. It's easy to tie and easy to dress, and it's easy to untie after it has been under a strain, and the two loops can be re-sized fairly easily. It's generally considered to have the same strength rating as the basic Bowline.
Ashley says that "It is the knot generally used at sea for lowering an injured man from aloft." (The Ashley Book of Knots, p.194, #1080). As Ashley points out, this knot has a long track record of use in rescue situations, so it's considered by many sailors and rescue workers to be a strong enough knot to be used when lives are at stake. One potential disadvantage of the Bowline on the Bight is that you can't pass the end of the rope around an object while tying the knot, but this is probably not something which needs to be done very often. Ashley also points out that the pull on the two ends should be approximately parallel, which is a potential disadvantage that the Double Alpine Butterfly doesn't have.
According to Budworth, "all sailors sooner or later are faced with some urgent improvisation. This is one such knot, which can be used for lowering an injured person and other emergencies. One leg is put through each loop and the patient (if conscious and capable) holds tight onto the rope at chest level, or is somehow secured to it. It reduces the strength of the line in which it is tied by up to 40%." (The Complete Book of Knots, p.38).
In The Complete Rigger's Apprentice, Brion Toss says that the Bowline on a Bight "is not entirely dependable when the strain comes on one part only or when the two standing parts are pulled in opposite directions. In the former instance, make a Bowline on a Bight with a Bowline on it [i.e. tie off the end of the rope with a Bowline, somewhere above the knot formed by the Bowline on a Bight] (Figure 3-14B). In the latter instance try a different knot such as the Farmer's Loop (Figure 3-15) or the Butterfly Knot (Figure 3-16)." (p.58, brackets added).
This knot creates two or more loops.
To tie a Double Alpine Butterfly, wrap the rope several times around your hand so that you have four strands of rope laying on the palm of your hand (picture 1 below). The two strands in the middle (strands 2 and 3) will become the loops, so make them as big as they need to be (as in picture 1). Grab the left-most strand (#1 in picture 1) and bring it all the way to the right over all of the other strands (pictures 1 and 2). Now grab the two left-most strands (#2 and #3 in picture 3) and bring them all the way to the right over all of the other strands (pictures 3 and 4). After bringing strands 2 and 3 over the other strands, push those two back to the left under the other strands (picture 5). Dress the knot as in picture 6. If you pull the two ends in opposite directions then the knot will form itself into the configuration which is more familiar to many people (picture 7).
 -1
-1
 -2
-2
 -3
-3
 -4
-4
 -5
-5
 -6
-6
 -7
-7
To tie a Triple Alpine Butterfly, wrap the rope several times around your hand so that you have five strands of rope laying on the palm of your hand (picture 1 below). The three strands in the middle (strands 2, 3, and 4) will become the loops, so make them as big as they need to be (as in picture 1). Grab the left-most strand (#1 in picture 1) and bring it all the way to the right over all of the other strands (pictures 1 and 2). Now grab the three left-most strands (#2, #3, and #4 in picture 3) and bring them all the way to the right over all of the other strands (pictures 3 and 4). After bringing strands 2, 3, and 4 over the other strands, push those three back to the left under the other strands (picture 5). Dress the knot as in picture 6.
 -1
-1
 -2
-2
 -3
-3
 -4
-4
 -5
-5
 -6
-6
The Double and Triple Alpine Butterfly seem to have all of the advantages and disadvantages of the Alpine Butterfly, except that they can't easily be made in such a way that you're able to pass the loops around an object while you're tying the knot. However, this is probably not something which needs to be done very often.
Method #1
This is a variation of the
Double Dragon
which turns it into a double-loop knot. First begin tying the normal
Double Dragon
as in pictures 1 and 2. Then push
two
bights
through the small loop on the right (instead of just one, as in the
single-loop Double Dragon)
(picture 3). Essentially you're creating a "slipped"
Double Dragon
(for more on a "slipped" knot, see the
Slip Knot).
At this point I find that it's helpful to tighten the knot a bit before continuing (picture 4). Now take the small loop which is sticking out to the left in picture 4 and bring it to the right and over the two (or more) main loops until it's behind the main loops (picture 5). Bring that loop all the way around until it lays below the knot (picture 6). You can now easily change the sizes of the loops, then finish dressing and setting the knot (picture 7).
 -1
-1
 -2
-2
 -3
-3
 -4
-4
 -5
-5
 -6
-6
 -7
-7
To tie a Triple Double Dragon, first begin tying the Double Double Dragon as in pictures 1, 2, and 3 (above). To make this a triple loop, simply take the end of the bight which is pointing towards the left in picture 3 (above) and bend it back to the right and push it through the knot (picture 1 below). As picture 1 (below) shows, you now have three bights pointing towards the right (these will become the main loops) and two bights pointing towards the left. At this point I find that it's helpful to tighten the knot a bit before continuing (picture 2). Now take the two loops which are on the left in picture 2 and bring them over to the right and around the three main loops until they're behind the three main loops (picture 3). This is similar to the way that the Double Double Dragon is formed (above). Bring those two loops all the way around until they lay below the knot (picture 4). You can now change the sizes of the loops fairly easily before dressing and setting the knot (picture 4).
 -1
-1
 -2
-2
 -3
-3
 -4
-4
This method makes it easy to convert a single-loop Double Dragon into a double-loop Double Dragon, and to convert a double-loop Double Dragon into a triple-loop Double Dragon.
Method #2
Here's an alternate way to tie the Double Double Dragon which allows you to create two or more loops around an object
while
you tie the knot (rather than
after
you tie the knot as with Method #1). Begin by tying the first few steps of the
single-loop Double Dragon
until you reach a configuration similar to picture 1 (below). You now have a
bight
of rope laying across your fingers with a strand of rope coming through it. Pass the end of the rope into the
bight,
then over the top and around the
bight,
then back out of the
bight
again as in picture 2. In picture 2, notice that you've tied a
Reef Knot.
Now you simply finish tying a
single-loop Double Dragon
in the normal way by passing the end of the rope around the object again, then passing the end of the rope into the
bight
and around your fingers until it lays over the tops of the two strands of rope on your fingers (picture 3). Wrap the end of the rope twice around the two strands of rope on top of your fingers and then tighten the knot, just like you would do with the
single-loop Double Dragon
(picture 4). In picture 4, pull out the strand of rope which you created in picture 2, and use it to adjust the relative sizes of the two loops which have been passed around the object, then finish dressing and setting the knot (picture 5).
 -1
-1
 -2
-2
 -3
-3
 -4
-4
 -5
-5
To make three or more loops, tie the knot until you finish picture 2, then pass the end of the rope around the object (to make the second loop around the object). Now follow picture 2 again to pass the end of the rope into the bight, then over the top and around the bight, then back out of the bight again, then pass the end of the rope around the object for the third time, and so on.
The Double and Triple Double Dragon seem to have all of the advantages and disadvantages of the single-loop Double Dragon.
This knot creates two or more loops.
To tie a Double Figure-Eight Loop, start with a "slipped" Figure-Eight Loop (pictures 1 and 2), which creates two loops where there would normally have been only one loop (for more on a "slipped" knot, see the Slip Knot). Slightly open up the end of the doubled rope which is sticking up at the top in picture 2 and pass it all the way around the two main loops and over the knot, as in pictures 3, 4, 5, and 6. Dress and set the knot (picture 7). Make sure to dress the knot properly so that all of the strands of rope are parallel to each other and don't cross over each other unnecessarily.
 -1
-1
 -2
-2
 -3
-3
 -4
-4
 -5
-5
 -6
-6
 -7
-7
To tie a Triple Figure-Eight Loop, start as in pictures 1 and 2 above, which creates two loops where there would normally have been only one loop. Then take the end of the doubled rope which is sticking up at the top in picture 2 (above) and bring it up and around the main part of the rope and tuck it through the same opening in which you had tucked the other two loops (picture 1 below). Dress and set the knot (picture 2 below). Make sure to dress the knot properly so that all of the strands of rope are parallel to each other and don't cross over each other unnecessarily.
 -1
-1
 -2
-2
The Double and Triple Figure-Eight Loop seem to have all of the advantages and disadvantages of the Figure-Eight Loop, except that they can't easily be made in such a way that you're able to pass the main loops around an object while you're tying the knot. However, this is probably not something which needs to be done very often.
This is another variation of the basic Bowline which can create two or more loops.
 -1
-1
 -2
-2
 -3
-3
The French Bowline is slightly easier to tie than the Birmingham Bowline, and it seems to have basically the same advantages and disadvantages as the Birmingham Bowline. One disadvantage with the French Bowline is that it's fairly easy for one of the loops to get bigger and the other loop to get smaller. This can potentially pose a hazard when hoisting or lowering people or heavy objects because it might allow the load to shift.
The French Bowline is also called the Portuguese Bowline in some books and websites, but I've seen other websites (such as this one) which describe the Portuguese Bowline slightly differently. Rather than bringing the end of the rope through the small loop in picture 1, you bring the end of the rope on top of the small loop. According to some people, this is the difference between the French and Portuguese Bowlines. I haven't been able to find any strength ratings for the French or Portuguese Bowlines, but they would appear to have a similar strength rating as the basic Bowline because the core knot configuration is the same.
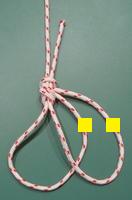
This knot creates two loops.
Start with a Figure-Eight Loop (picture 1). Slightly open up the end of the doubled rope which is sticking down at the bottom in picture 1 and bring it up and all the way over the knot, as in picture 2. Grab the two strands of rope which are marked with a yellow square in picture 2 and pull them out (picture 3) to become the two loops for this loop knot (picture 4).
 -1
-1
 -2
-2
 -3
-3
 -4
-4
The Karash Double Loop website describes the use of this knot for rescue purposes, including links to some test data for this knot. It also contains a link to this YouTube video which demonstrates several ways of quickly making rescue harnesses with this knot. It appears to be quick to tie, and easy to untie after it has been under a strain, and it appears to be a strong and secure rescue knot.
This knot creates two loops.
First double the rope to create a long bight (an open loop), then bring the end of the bight back behind the main part of the rope to create two loops (picture 1) and give each loop a twist (picture 2). Then take the loop on the left and move it over to the right inside of the loop on the right (picture 3). The "X" (the crossed ropes) in picture 3 is on the outside, on top of the two vertical lines of rope. Picture 3 shows four "loops," and you extend the two bottom "loops" and bring them up and through the two upper loops to form the two main loops (picture 4). Dress and set the knot (picture 5).
 -1
-1
 -2
-2
 -3
-3
 -4
-4
 -5
-5
One advantage is that the Spanish Bowline can be tied in the middle of a rope when you don't have access to the ends of the rope (unlike the Birmingham Bowline and the French/Portuguese Bowlines). However, it might be possible for the loops to change sizes (posing the same hazard as the French/Portuguese Bowlines), and it can be difficult to remember how to tie this knot when you need it.
I haven't been able to find any strength/security ratings for the Spanish Bowline.
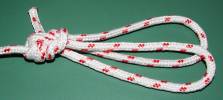
This knot creates three loops.
If you know how to tie the basic Bowline then the Triple Bowline is easy to remember because it's tied exactly like a basic Bowline. The only difference is that you tie the knot using a doubled rope (a long bight), then you extend the end of the bight until it becomes a third loop.
-1
 -2
-2
 -3
-3
The Triple Bowline can be tied in the middle of a rope when you don't have access to the ends of the rope, but I haven't been able to find any strength/security ratings for this knot.
According to Budworth, "The triple bowline can be used to make a sit sling, chest sling or full harness." (The Complete Book of Knots, p.92).
This is a "splayed" double-loop knot similar to the ABOK #1100 double loop and the Spanish Bowline. In other words, the two loops hang apart from each other rather than laying on top of each other.
 -1
-1
 -2
-2
 -3
-3
 -4
-4
 -5
-5
One advantage with the Triple Crown is that it can be tied in the middle of a rope when you don't have access to the ends of the rope (unlike the Birmingham Bowline and the French/Portuguese Bowlines). Additionally, the loops can't easily grow or shrink accidentally, so this knot is safer in that respect than the French/Portuguese Bowlines or the Spanish Bowline. However, it might be difficult to remember how to tie this knot when you need it.
I haven't been able to find any strength/security ratings for the Triple Crown.