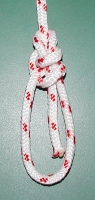
The Alpine Butterfly is generally considered to be one of the strongest and most secure loop knots.
Method #1
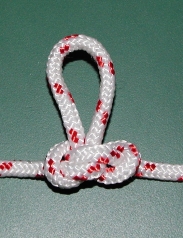
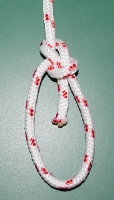
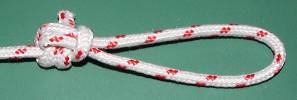
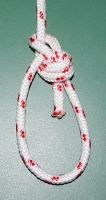
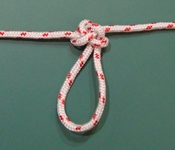
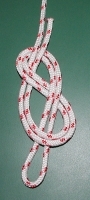
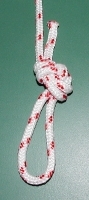
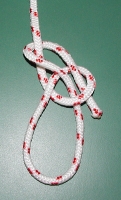
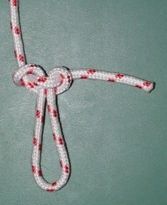
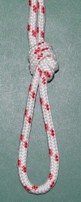
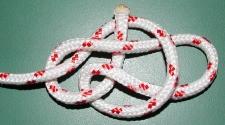
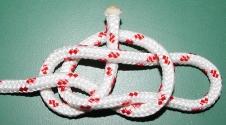
Give the rope two twists as in the first picture, which creates two loops (it doesn't matter which direction you twist). Put your hand through the upper loop (picture 2), then put your fingers through the other loop (picture 3). Bring the upper loop over to your fingers (pictures 3 and 4), then grab the upper loop with your thumb and finger and pull your hand all the way out. In picture 5, the loop that you pulled through the knot is now hanging down at the bottom. Dress and set the knot (picture 6). This looks a little complicated when it's captured in pictures, but it's actually quite simple and quick to do. If you pull the two ends in opposite directions then the knot will form itself into the configuration which is more familiar to many people (picture 7).
 -1
-1
 -2
-2
 -3
-3
 -4
-4
 -5
-5
 -6
-6
 -7
-7
Method #2
Wrap the rope several times around your hand so that you have three strands of rope laying on the palm of your hand (picture 1 below). Grab the left-most strand (#1 in picture 1) and bring it all the way to the right over the other two strands (pictures 1 and 2). Once again grab the left-most strand (#2 in picture 3) and bring it all the way to the right over the other two strands (pictures 3 and 4). After bringing strand #2 over the other two strands, push it back to the left
under
the other two strands (picture 5). Now dress the knot so that strand #2 becomes the loop, keeping strands 3 and 1 in the same order as they are in picture 5. The dressed knot should look like picture 6 above. Since strand #2 will become the loop, you can resize it before you push it to the left under the other two strands.
There are other ways to tie an Alpine Butterfly using a method similar to this, but I prefer this method for two reasons. First, it's easier to remember because you always pick up the left-most strand and bring it all the way to the right over the other two strands. Second, it automatically results in a well-dressed knot because it puts strands 1 and 3 into the proper positions so that you end up with the knot in picture 6 above.
 -1
-1
 -2
-2
 -3
-3
 -4
-4
 -5
-5
Method #3
For another way to tie the Alpine Butterfly, see
Animated Knots by Grog.
Method #4
To tie an Alpine Butterfly around an object, first tie an
Overhand Knot
(picture 1 below), then pass the end of the rope around the object and insert the end of the rope into the
Overhand Knot
to form a
Slip Knot
(picture 2). Bring the end of the rope over the main part of the rope and around the knot (picture 3), then behind the loop (picture 4), then insert it into the knot so that it follows the main part of the rope (picture 5). After you dress and set the knot (picture 6), it should look similar to picture 6 above.
 -1
-1
 -2
-2
 -3
-3
 -4
-4
 -5
-5
 -6
-6
KnotMaker drawing of picture 5:
Method #5
For another way to tie the Alpine Butterfly, see The Hybrid Method Of Tying The Alpine Butterfly.
The Alpine Butterfly is fairly easy and quick to tie, and it's generally considered to be as strong and secure as the Double-Knotted Bowline and the Figure-Eight Loop. Dressing this knot is quick and easy, and it's fairly easy to untie after it has been under a strain (unlike the Figure-Eight Loop).
Ashley says that "It has an excellent lead and is strong, secure, and easily tied; a better knot in every way than the Harness Loop." (The Ashley Book of Knots, p.190, #1053).
According to Budworth, the Alpine Butterfly "can be pulled in two (or even three) directions at once without distorting or capsizing. ... 'If the Bowline is "the King of Knots",' wrote John Sweet in his book Scout Pioneering (1974), 'this must surely be the "Queen".'" (The Complete Book of Knots, p.86-87).
Budworth also says that if your rope is damaged then you can isolate the damaged area by tying an Alpine Butterfly around it (The Complete Book of Knots, p.86).
So the Alpine Butterfly is generally considered to be one of the strongest and most secure loop knots that can be tied in the middle of a rope or at the end of a rope. It can be pulled in two or three directions without distorting, and it can be used to strengthen a damaged rope by isolating the damaged area. The Alpine Butterfly can also be tied as a multi-loop knot, and it can be used to tie a rope around an object, and it can be used as a bend. These things make the Alpine Butterfly a very versatile and valuable knot to know.
The Bowline has been called "the King of Knots," and it's used around the world in one form or another.
Method #1
First make a small loop so that the rope crosses over on top of itself, then bring the end of the rope up through that small loop (picture 1). Bring the end of the rope around behind the main part of the rope and insert it into the small loop (picture 2). Dress and set the knot (picture 3).
 -1
-1
 -2
-2
 -3
-3
KnotMaker drawing of picture 2:
Method #2
Here's a quick method of tying a Bowline. First pass the end of the rope around an object, then make a loose Half Hitch around the main part of the rope as in picture 1 below (notice that the end of the rope crosses over on top of itself as it forms a loop). Pull on the end of the rope, and the Half Hitch will be transferred to the main part of the rope (picture 2). You should now have the same configuration as in picture 1 above.
 -1
-1
 -2
-2
Method #3
Here's another quick method of tying a Bowline. First form a loop, making sure that the end of the rope lies on top of the main part of the rope (picture 1 below). Grab the rope where it crosses itself, with your thumb underneath and your fingers on top (picture 2). Flip your hand over so that your fingers and the end of the rope go inside the loop (picture 3). You should now have the same configuration as in the original picture 1 above.
 -1
-1
 -2
-2
 -3
-3
Method #4
Here's an interesting way to tie a Bowline. Pass the end of the rope around an object, then tie a loose
Slip Knot
in the main part of the rope as in picture 1 below. Pass the end of the rope through the
Slip Knot
in the direction shown in picture 2. Pull on the main part of the rope, and the knot will capsize into a Bowline.
 -1
-1
 -2
-2
 -3
-3
Some people feel that the Bowline weakens a rope too much, but other people say that they've been using the Bowline for years with no problems, even when towing heavy loads or when lifting (or lowering) injured people to safety. However, the Bowline can loosen up when there's no load on it (especially in some synthetic ropes), which increases the possibility of it coming undone or distorting. For a discussion of some ways to "lock" a Bowline to make it more secure, see the forum topic called Simple lock for the bowline at the International Guild of Knot Tyers.
According to Ashley, "Properly tied in ordinary rope, there is little or no danger of a Bowline Knot's capsizing before the breaking point of the rope itself is reached. It is so good a knot that the sailor seldom uses any other Loop Knot aboard ship." (The Ashley Book of Knots, p.186, #1010).
Budworth says that "It is far from the strongest loop knot, reducing the breaking strength of any stuff in which it is tied by as much as 40%. Nor is it very secure, particularly when the rope is stiff or slippery, when it has been known to capsize (if excessively loaded) or alternatively to spring or shake itself apart (when unloaded). Nevertheless the bowline can be used for a wide range of jobs, from securing the string before tying a parcel, to outdoor pursuits such as climbing. When I was a Metropolitan Police frogman in the 1960's, my colleagues and I tied the line around our waists with a simple bowline. The working end (deliberately made long) was then tucked several times around the adjacent part of the loop to secure it. Climbers' manuals advise their readers to finish off such tucks with one or two half-hitches (made in the opposite direction to the twist) for even greater security and peace of mind." (The Complete Book of Knots, p.36).
The Bowline has a long history and a long track record of safe use when properly tied, and it's useful in a wide variety of situations. The Bowline can also be tied as a multi-loop knot, and it can be used to tie a rope around an object, and it can be used as a bend. These things make the Bowline a versatile and valuable knot to know.
For some thoughts on turning the Carrick Bend into a loop knot, see the forum topics called Carrick Bend adapted as end of line loop? and The Carrick Loop at the International Guild of Knot Tyers.
For some thoughts on turning the Constrictor Knot into a loop knot, see the forum topic called Compact loop on a bight!? at the International Guild of Knot Tyers.
The Double Dragon was shown to me by Paul Kruse, an engineer at an industrial rigging shop.
The Alpine Butterfly is generally considered to be one of the strongest and most secure loop knots, and in Paul's experience and testing at his rigging shop, the Double Dragon seems to rival the Alpine Butterfly in strength, security, reliability, and so on. They use this knot quite frequently at his company.
Method #1
First create two
bights
as in picture 1, then wrap the end of the rope twice around the lower
bight
to create a big loop on the left and a small loop on the right (picture 2). Bring the big loop (on the left) over the knot and push it through the small loop on the right (picture 3), then dress and set the knot (picture 4).
 -1
-1
 -2
-2
 -3
-3
 -4
-4
KnotMaker drawing of pictures 1, 2, and 3:
Method #2
This is a variation for tying a Double Dragon around an object. After you wrap the end of the rope around an object (picture 1), make a loop around your fingers with the main part of the rope (picture 2). Flip the loop over (grab the bottom of the loop and bring it towards you and up until it becomes the top of the loop) and place it back onto your fingers to form a "collar" around the rope (picture 3), then thread the end of the rope back through that "collar" (picture 4). Now bring the end of the rope over the top of the upper two sections of rope on your fingers (picture 5), and wrap the end of the rope twice around those two upper sections of rope (picture 6). Dress and set the knot (picture 7).
 -1
-1
 -2
-2
 -3
-3
 -4
-4
 -5
-5
 -6
-6
 -7
-7
One nice thing about tying the Double Dragon around an object is that it doesn't require tying any kind of knot before passing the end of the rope around the object (similar to the Bowline, but unlike the Alpine Butterfly and the Rethreaded Figure-Eight Loop).
The Double Dragon is fairly easy to remember how to tie, and it's easy and quick to tie, and it seems to be as strong and secure as the Alpine Butterfly and the Double-Knotted Bowline and the Figure-Eight Loop (which are all generally considered to be equal in strength).
Budworth says that if your rope is damaged, you can isolate the damaged area by tying an Alpine Butterfly around it (The Complete Book of Knots, p.86), and the same might be true for the Double Dragon. However, there has been some discussion on the forum of the International Guild of Knot Tyers concerning the use of the Double Dragon as a mid-line loop because the knot might become difficult to untie if it has been under a heavy strain (for example, see the forum topic called Double Dragon vs. Double-tucked Angler).
The Double Dragon is actually a double-wrapped Tugboat Bowline.
If you tie a Double-Knotted Bowline and pass the end of the rope back through the top of the knot (so that it follows the path of the main part of the rope), then you've tied a reversed Double Dragon.
The Double Dragon can also be tied as a multi-loop knot, and it can be used to tie a rope around an object, and it can be used as a bend.
Adding a second small loop to a basic Bowline gives it essentially the same strength rating as the Alpine Butterfly and the Figure-Eight Loop. Some people refer to this knot as the Double Bowline, which might be confusing because "Double Bowline" is also a good description for a double-loop Bowline.
Method #1
 -1
-1
 -2
-2
 -3
-3
KnotMaker drawing of picture 2:
Method #2
For another way to tie the Double-Knotted Bowline, see Double Bowline (rapid / slip knot method).
According to Budworth, "If the [bowline] will have to withstand rough treatment, tie the double bowline (figs 8-9). This has a breaking strength of 70-75% and is therefore stronger and far more secure than a basic bowline." (The Complete Book of Knots, p.37, brackets added).
Also see the Water Bowline (below), which is somewhat similar to the Double-Knotted Bowline. The difference is that the two small loops in the Water Bowline form a Clove Hitch.
Again, the Bowline is a valuable knot to know, and the Double-Knotted Bowline increases the Bowline's strength up to the level of the Alpine Butterfly and the Figure-Eight Loop.
The Farmer's Loop can be tied around the hand similar to Method #2 for tying the Alpine Butterfly (above). First wrap the rope several times around your hand so that you have three strands of rope laying on the palm of your hand (picture 1). Grab the middle strand (#2 in picture 1) and bring it to the right over strand #3 (picture 2). Once again grab the middle strand (#3 in picture 2) and bring it to the left over strand #1 (picture 3). Once again grab the middle strand (#1 in picture 3) and bring it to the right over strand #2 (picture 4). Once again grab the middle strand (#2 in picture 4) and pull it out (picture 5) so that it becomes the loop for this loop knot. Dress and set the knot (picture 6).
 -1
-1
 -2
-2
 -3
-3
 -4
-4
 -5
-5
 -6
-6
There's not much information out there concerning the strength or security of the Farmer's Loop.
The Figure-Eight Loop is generally considered to be 10-15% stronger than the basic Bowline and essentially the same strength as the Alpine Butterfly and the Double-Knotted Bowline.
Method #1
Simply double the rope and then tie a basic
Figure-Eight Knot
(picture 1). Make sure to dress the knot properly so that all of the strands of rope are parallel to each other and don't cross over each other unnecessarily (picture 2).
 -1
-1
 -2
-2
KnotMaker drawing of picture 1:
Method #2
An alternate way to tie the Figure-Eight Loop is called the Rethreaded Figure-Eight Loop or the Rewoven Figure-Eight Loop or the Retraced Figure-Eight Loop or the Figure-Eight Follow-Through. First tie a basic Figure-Eight Knot in the rope (picture 1 below), then pass the end of the rope around an object (picture 2). Now thread the end of the rope back through all of the twists and turns of the Figure-Eight Knot (pictures 3 and 4). If you do this properly then you'll end up with a Figure-Eight Loop. Make sure to dress the knot properly so that all of the strands of rope are parallel to each other and don't cross over each other unnecessarily (picture 5).
 -1
-1
 -2
-2
 -3
-3
 -4
-4
 -5
-5
The Rethreaded Figure-Eight Loop isn't difficult, but it's not a "quick" knot to tie. It has all of the strength and security of the Figure-Eight Loop, and it's used frequently by rock climbers. However, people have had serious accidents by not properly rethreading the Figure-Eight Knot (for example, see SILT HAPPENS #99-2 and do a Find on "Figure 8's vs. Bowlines").
Ashley says that this knot is "perhaps stronger than [the Overhand Loop]. Neither of these knots is used at sea, as they are hard to untie." (The Ashley Book of Knots, p.190, #1047, brackets added).
According to Budworth, "the figure eight knot layout is a versatile alternative to a bowline, a bowline in the bight or a triple bowline ... Remove any twists so that paired parts of the knot are parallel with one another. For maximum strength, climbers recommend that the standing bight [the first turn from the main part of the rope] ... should lie on the outside of the bend" (The Complete Book of Knots, p.88, brackets added).
This knot is easy to remember how to tie, and it's easy to tie, and it's generally considered to be strong and secure. However, this knot has some disadvantages. For one thing, dressing the knot properly is not always a quick thing to do. If the knot is not properly dressed (in other words, if the rope crosses over itself unnecessarily) then it will weaken the rope more than you might realize. Another big disadvantage is that this knot is difficult to untie after it has been under a strain.
The Figure-Eight Loop can also be tied as a multi-loop knot, and it can be used to tie a rope around an object, and it can be used as a bend.
This is another form of a Figure-Eight Loop.
 -1
-1
 -2
-2
 -3
-3
KnotMaker drawing of picture 2:
The Inline Figure-Eight Loop can be tied in the middle of a rope when you don't have access to the ends of the rope, and it's less bulky than the Figure-Eight Loop, and it passes more easily over a pulley or an obstruction than other loop knots. However, there isn't much data to indicate how strong or reliable this knot is.
KnotMaker drawing:
Ashley says that this is distinctly inferior to the basic Bowline (The Ashley Book of Knots, p.188, #1034.5), but not everyone agrees with Ashley's opinion. For example, it's possible that this knot is more secure in shock cord than the basic Bowline, as mentioned on the forum of the International Guild of Knot Tyers.
This is another loop knot which can be tied in the middle of a rope or at the end of a rope. In picture 1, the end of the rope is completely underneath the loop (in other words, this is not an Overhand Knot in picture 1).
 -1
-1
 -2
-2
 -3
-3
KnotMaker drawing of picture 2:
Ashley says that the Alpine Butterfly is "a better knot in every way than the Harness Loop." (The Ashley Book of Knots, p.190, #1053).
This knot is very similar to the Tugboat Bowline (below).
This is another loop knot which can be tied in the middle of a rope. To tie this knot, simply double the rope and then tie an Overhand Knot.
 -1
-1
 -2
-2
KnotMaker drawing of picture 1:
Ashley says that the Figure-Eight Loop is "perhaps stronger than [the Overhand Loop]. Neither of these knots is used at sea, as they are hard to untie." (The Ashley Book of Knots, p.190, #1047, brackets added).
This knot is easy to remember and easy to tie, but it can be very difficult to untie after it has been under a strain.
Since the Perfection Loop and the Tugboat Bowline are so similar to each other, I'll show them both here in order to make the differences easier to see. There are two main knots which are sometimes referred to as the Tugboat Bowline, so I'll call them "Tugboat A" and "Tugboat B."
These three knots are shown in the order of "worst" (Tugboat A) then "better" (Tugboat B) then "best" (Perfection Loop), based on the discussion of these knots on the forum of the International Guild of Knot Tyers.
To tie these knots, start as in picture 1 and then wrap the end of the rope once around by bringing it down behind the rope and back up over the rope (picture 2). You now have a loop on the left and a bight on the right. Grab the loop and bring it to the right over the end of the rope, then tuck it through the bight on the right (picture 3) to become the main loop (picture 4).
Tugboat A (pictures 1, 2, and 3):
 -1
-1
 -2
-2
 -3
-3
Tugboat B (pictures 1, 2, and 3):
 -1
-1
 -2
-2
 -3
-3
Perfection Loop (pictures 1, 2, and 3):
 -1
-1
 -2
-2
 -3
-3
KnotMaker
drawings of pictures 1, 2, and 3:
| Tugboat A: | Tugboat B: | Perfection Loop: |
 |
 |
 |
Tugboat A (front and back):
 -4
-4
 -5
-5
Tugboat B (front and back):
 -4
-4
 -5
-5
Perfection Loop (front and back):
 -4
-4
 -5
-5
The Perfection Loop is said to be stable as shown above. However, it has a tendency to jam (i.e. it can become difficult to untie), which is necessary for fishermen but not always a good thing in rope. Tugboat A is prone to deforming and capsizing, so it needs to have the end of the rope wrapped a second time around in order to be stable (forming the Double Dragon, which is a strong and secure knot). Tugboat B benefits from a second wrap as well.
Tugboat A with a second wrap (i.e. the
Double Dragon):
Tugboat B with a second wrap:

The Tugboat Bowline is apparently referred to as the Speed Bowline in Knot Throwing by Bill Fry and Becky Rosada. Tugboat B is sometimes referred to as the Flying Bowline.
In picture 3 of Tugboat A, if you take the main loop and give it a twist then you'll have the Artillery Loop.
In picture 1 of Tugboat B, if you give the loop a twist then you'll have picture 1 for the Perfection Loop.
Notice that the Perfection Loop and the Tugboat Bowline(s) can be tied "in the bight," which means that they can be tied in the middle of the rope without using the ends of the rope.
For a discussion of these knots, see the forum topic called Tugboat Bowline(s) and Perfection Loop at the International Guild of Knot Tyers.
See the Perfection Loop (above).
See the Vice Versa Bend.
Adding a second small loop to a Bowline (picture 1), then passing the end of the rope through both small loops (picture 2), adds more security to the Bowline. It also makes the Bowline less likely to jam when wet, hence the name of this knot.
Method #1
 -1
-1
 -2
-2
 -3
-3
Draw up both small loops snugly together when dressing the knot (picture 3), but don't be concerned if the small loops separate from each other during use. You can use Method #3 for tying the Bowline in order to create the lower loop of the Water Bowline, then use the same method to create the upper loop.
Method #2
For another way to tie the Water Bowline, see
Water Bowline (rapid / slip knot method).
KnotMaker drawing of picture 2:
For a discussion of some other ways to "lock" a Bowline to make it more secure, see the forum topic called Simple lock for the bowline at the International Guild of Knot Tyers.
Also see the Double-Knotted Bowline (above), which is somewhat similar to the Water Bowline. The difference is that the two small loops in the Water Bowline form a Clove Hitch.
Again, the Bowline is a valuable knot to know, and the Water Bowline adds security and jam-resistance to a Bowline.
For some thoughts on turning the Zeppelin Bend into a loop knot, see the forum topics called For those familiar with Zeppelin Loop and Zeppelin Bend and Zeppelin, a rule of thumb at the International Guild of Knot Tyers, as well as Rosendahl's Zeppelin Loop on YouTube.