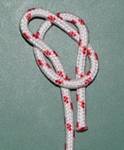
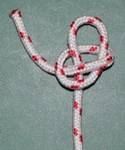
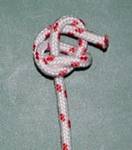
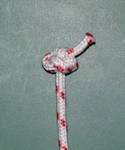
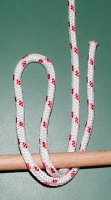
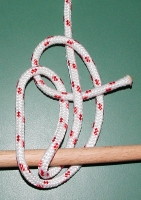
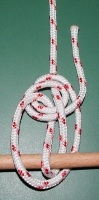
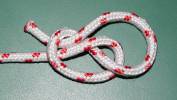
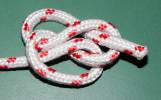
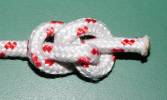
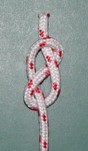
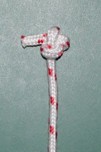
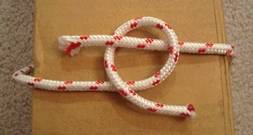
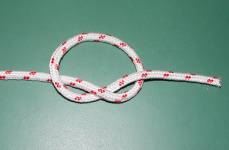
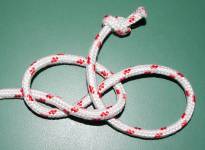
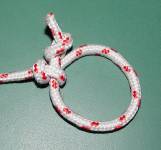
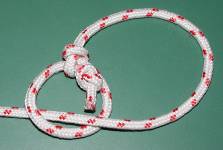
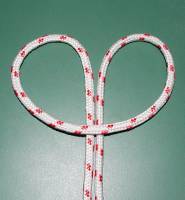
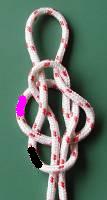
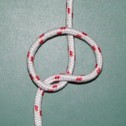
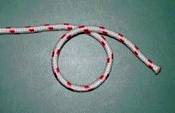
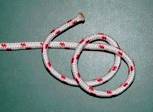
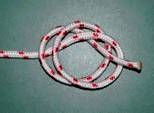
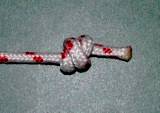
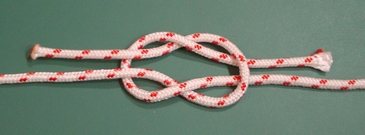
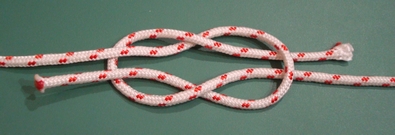
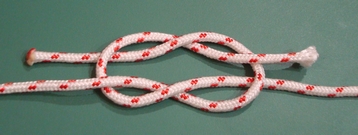
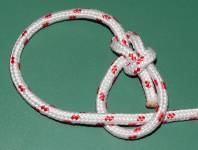
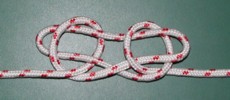
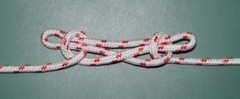
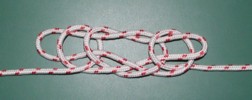
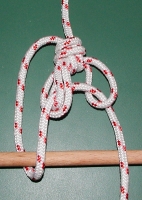
Tying a "stopper knot" at the end of the rope can help prevent the end from slipping through the knot due to a heavy load or a series of jerks on the rope.
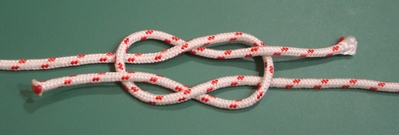
To tie this knot, first tie a Slip Knot (picture 1), then bring the end of the rope back through the loop (pictures 2 and 3). If you follow the pictures then you should end up with a nice, bulky knot (picture 4).
 -1
-1
 -2
-2
 -3
-3
 -4
-4
According to Budworth, "Clifford W. Ashley, whose monumental work The Ashley Book of Knots is every knot enthusiast's bible, devised this knot sometime before 1910." (The Complete Book of Knots, p.32).
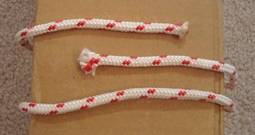
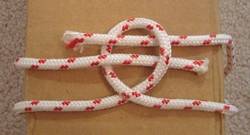
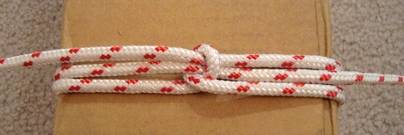
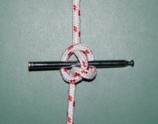
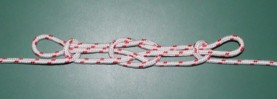
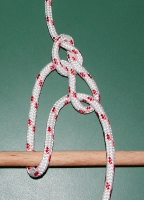
When you need to tie a hitch in a hard-to-reach place (such as a car axle), or if you want extra security by having a double hold on an object, then this hitch might come in handy. First pass a bight (a doubled rope) around the object as in picture 1. Bring the end of the rope over the main part of the rope, then through the bight from behind, then behind the main part of the rope, then crossing over itself (picture 2). Now thread the end of the rope back through the bight a second time, exactly like the first time (picture 3), then tie it off with a Bowline (or something else such as a Double Dragon) in the main part of the rope (picture 4). This seems to be more of a specialty hitch, which is why I placed it in this section rather than in the section on Hitches.
 -1
-1
 -2
-2
 -3
-3
 -4
-4
When a Lark's Head Hitch is used for hoisting or lowering objects then it's sometimes referred to as the Bale Sling Hitch. This seems to be more of a specialty hitch, which is why I placed it in this section rather than in the section on Hitches.
Notice that the end of the rope is tied off with a Bowline in the main part of the rope, although a Double Dragon can be used as well.
This is the simplest yet most effective method of hoisting or lowering an object while keeping it in a vertical position. This seems to be more of a specialty hitch, which is why I placed it in this section rather than in the section on Hitches.
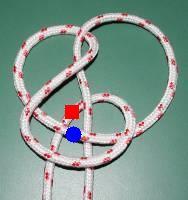
Method #1
First tie a fairly large
Overhand Knot
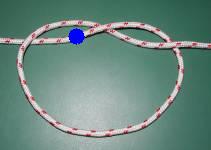
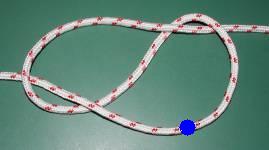
as in picture 1. Where the rope crosses itself in the middle of the knot (near the blue dot in picture 1), grab the strand of rope on top and bring it towards you, then lay it back down as in picture 2 (notice where the blue dot is in picture 2). In picture 2, notice that there's a strand of rope which runs diagonally from the bottom left to the top right, creating two large loops. Place the object to be lifted on top of that diagonal strand of rope, then carefully bring those two loops up the sides of the object, and you should be able to lift up the object using both ends of the rope.
 -1
-1
 -2
-2
 -3
-3
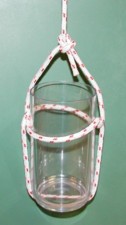
In picture 3 (above), notice that the end of the rope is tied off with a Bowline in the main part of the rope. although a Double Dragon can be used as well.
Method #2
Notice that picture 2 (above) looks similar to a
Figure-Eight Knot.
Try tying a
Figure-Eight Knot
instead of an
Overhand Knot,
and you'll find that it works just as well for making a Barrel Hitch.
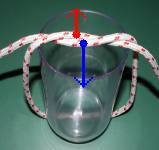
Method #3
Once you see how the Barrel Hitch works, an easier way to tie it is to set the object on top of the rope (without any knots in the rope) and then tie a simple
Overhand Knot
on top of the object as in the picture below. Now pull apart the
Overhand Knot
(as indicated by the arrows in the picture below) and bring those two strands of rope down the sides of the object so that you essentially end up with picture 3 above.
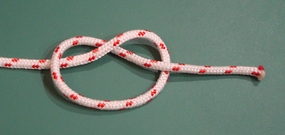
Tying a "stopper knot" at the end of the rope can help prevent the end from slipping through the knot due to a heavy load or a series of jerks on the rope.
To tie this knot, start with an Overhand Knot (picture 1), then follow the rest of the pictures.
 -1
-1
 -2
-2
 -3
-3
 -4
-4
Budworth calls this a "Blimp Knot" because it's similar to a Zeppelin Bend but is smaller and softer, and he says, "This is a nicely symmetrical ornamentation for an otherwise uninteresting length of cord." (The Complete Book of Decorative Knots, p.34).
The Blimp Knot also appears on the Decorative Knots page, but I included it here because it can be used as a "stopper knot" at the end of a rope or string.
See the Overhand Knot (below).
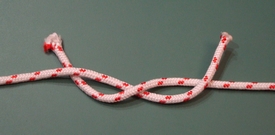
Tying a "stopper knot" at the end of the rope can help prevent the end from slipping through the knot due to a heavy load or a series of jerks on the rope.
To tie this knot, simply tie a Figure-Eight Knot at the end of the rope (picture 1), then tighten it (picture 2).
 -1
-1
 -2
-2
The Figure-Eight Knot is frequently used around the world as a "stopper knot."
This knot was devised by a person named Dahm, and it has received favorable reviews on the forum of the International Guild of Knot Tyers.
Method #1
To tie this knot, wrap the rope around a package or a bundle of sticks, etc., as in picture 1. Form a loop in the section of rope which has gone fully around the object (picture 2). Pass the ends of the rope through the loop in opposite directions (picture 3). Pull the ends of the rope to tighten the knot (picture 4).
 -1
-1
 -2
-2
 -3
-3
 -4
-4
Method #2
Bring the rope around the object, then make a Half Hitch around the other end of the rope as in the picture below. After forming the Half Hitch in one end of the rope, bring that same end of rope around the object one more time, and finish as in pictures 3 and 4 above.
This simple knot holds quite well, but the security can be increased by adding more Half Hitches. For some thoughts on how to do this, plus more ideas on ways of tying and using this knot (and how to pronounce the de facto name of this knot), see the forum topic called NOOB - I invented... now what? at the International Guild of Knot Tyers.
For some thoughts on similar knots, see the forum topics called Improving the Gleipnir binding knot and A simple hitch "a la Gleipnir" at the International Guild of Knot Tyers.
See the Reef Knot (below).
See the Reef Knot (below).
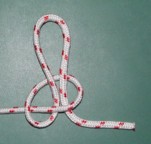
The Honda Knot is described as being a favorite among cowboys for making a lariat (which they use in order to lasso cows, horses, etc.).
To tie this knot, first tie an Overhand Knot (picture 1). Bring the end of the rope around and back through the Overhand Knot as in picture 2, then tie an Overhand Knot in the end of the rope to act as a "stopper knot" (picture 2). Dress and set the knot (picture 3). The Honda Knot creates a nearly-perfect circle, which is what makes it good for a lariat. To create a lariat, push a bight from the main rope through the loop created by the Honda Knot (picture 4).
 -1
-1
 -2
-2
 -3
-3
 -4
-4
To learn how to throw and spin a lariat, see Throw a Lariat.
Sailors refer to this type of knot (which will automatically tighten up under a strain) as a "running knot." For more "running knots," see the Running Bowline (below).
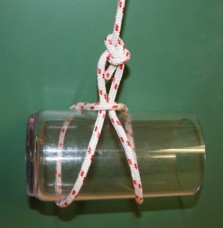
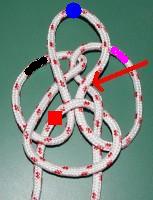
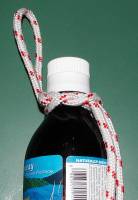
This knot is useful for creating a handle for bottles, bags, and so on.
To tie this knot, start as in picture 1. Grab the vertical strand of rope on the left (near the top), and bring it under the vertical strand on the right, then bend it back over towards the left again (picture 2). Notice the part of the rope which crosses over the two vertical strands in picture 1, and find that same section of rope in picture 2 (it's marked with a blue circle in picture 2). Bring that strand under the strand above it (marked with a red square in picture 2), then bring it over the two linked loops at the top of picture 2 (as in picture 3). With your thumb and finger, hold the two strands which are crossing each other where the red arrow is pointing in picture 3. Bring the pink and black sections of rope in picture 3 down to their new positions in picture 4. Place the neck of the bottle through the center of the knot, then tighten the knot (picture 5).
 -1
-1
 -2
-2
 -3
-3
 -4
-4
 -5
-5
This knot can also be found in the Decorative Knots section.
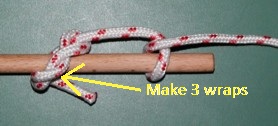
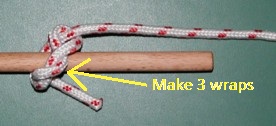
This is simply a Timber Hitch with a Half Hitch added, and it's useful for dragging long or heavy objects. This seems to be more of a specialty hitch, which is why I placed it in this section rather than in the section on Hitches.
NOTE: For clarity, the Timber Hitch in the picture only shows the end of the rope making a single wrap around itself. It's much more secure to make at least three wraps around, as indicated by the arrow in the picture.
Budworth says, "Use the killick hitch to tow long loads through water or drag them overland. It works well on rough objects, such as tree trunks, but can slip on smooth spars." (The Complete Book of Knots, p.47)
This is useful when you need a good grip on a string or a rope (in order to tighten down a load, for example).
To tie this knot, first make a loop as in picture 1, then cross the loop over the rope (picture 2). Now push an object such as a screwdriver through the knot as in picture 3. This gives you a handle to grab in order to tighten the rope or string. As soon as you remove the object, the knot will disappear.
 -1
-1
 -2
-2
 -3
-3
Notice that this is really just a Slip Knot with an object such as a screwdriver stuck through the loop.
Later I might add pictures for every hitch and binding knot which is related to the Constrictor Knot, but for now here's a link to an article which describes the Myrtle along with other methods and variations related to the Constrictor Knot. Also see the forum topic called Ever seen this "knot"? at the International Guild of Knot Tyers.
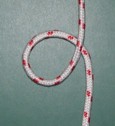
This is the simplest of all knots (picture 1). It's used as the base formation for a number of other knots (picture 2), such as the Reef Knot, the Granny Knot, and the Shoelace Knots.
 -1
-1
 -2
-2
To tie a Double Overhand Knot, simply tie an Overhand Knot in two loops instead of only in one loop (pictures 1, 2, and 3 below). Dress and set the knot (picture 4 below).
 -1
-1
 -2
-2
 -3
-3
 -4
-4
The Double Overhand Knot is sometimes used as a "stopper knot," such as with the Figure-Eight Bend. However, it can be difficult to untie.
This knot is often referred to as the Square Knot, but its proper name is the Reef Knot (here's the real Square Knot). It's made by tying two Overhand Knots. In the center of picture 1, notice that the end of rope which is coming in from the left has crossed over the end of rope which is coming in from the right. When the second Overhand Knot is tied in picture 2, notice that the end of rope which is coming from the right has crossed over the end of rope which is coming from the left. Therefore, some people remember how to tie a Reef Knot by using the phrase, "left over right, right over left."
Here's another way to remember how to tie a Reef Knot. Notice that the end of rope which is coming in from the left in picture 1 (which crosses over the other end of rope) is the same end of rope which crosses over the other end of rope in the second Overhand Knot in picture 2. Therefore, another way of remembering how to tie a Reef Knot is simply to make sure that the same end of rope crosses over the other end of rope in both of the Overhand Knots.
Reef Knot
-1
 -2
-2
Thief Knot
Granny Knot
Grief Knot or Whatnot
The Reef Knot is perhaps the best known parcel knot, but it doesn't hold well under a strain. It's also the best knot for tying a triangular bandage. Ashley says that it's admirable as a binder knot, "but under no circumstances should it be used as a bend." (The Ashley Book of Knots, p.258, #1402).
In other words, the Reef Knot should never be used for tying two ends of rope together. For some secure ways of tying two ends of rope together, see the Bends page.
According to Budworth, "Tying a reef knot around something ensures that the more strain placed upon it, the tighter it is pulled. It is not a bend and is quite weak (reducing the breaking strength of whatever it is tied in to no more than 45%), so avoid using it for ropes or any two bits of mismatched cordage. ... The Ancient Greeks, Romans and Egyptians all knew this knot and were aware of its superiority over the unreliable granny knot, which both slips and jams." (The Complete Book of Knots, p.134-135, emphasis added).
Now that you know the difference between a Reef Knot and a Granny Knot, try taking a close look at the way you tie your shoelaces. You're either tying them as Reef Knots or as Granny Knots, but notice that the Reef Knot will result in a better shoelace knot than the Granny Knot will. For some interesting variations on tying your shoelaces, see the Shoelace Knots (below).
The Thief Knot is similar to the Reef Knot, except that the ends of the rope emerge from the knot differently (look closely at the pictures). It apparently doesn't hold as well as the Reef Knot. Supposedly you can tie up a bag (or something else) with a Thief Knot, and if someone goes through your belongings then they're likely to re-tie the bag with a Reef Knot. This way you might be able to determine if someone has gone through your bag.
The Grief Knot is similar to the Granny Knot, except that the ends of the rope emerge from the knot differently (look closely at the pictures). It's sometimes used by magicians because apparently it can be manipulated in such a way that it appears to act like a knot, but with a twist of the ends it can easily fall apart. For this reason, it shouldn't be relied on in place of the Reef Knot.
This is useful if you need a loop which will automatically tighten up under a strain. First tie a Bowline, then push a bight from the main rope through the loop created by the Bowline as in the picture below.
Notice that almost any loop knot can be used to make this type of "running knot," such as an Alpine Butterfly or a Double Dragon.
For making lariats, cowboys generally prefer the Honda Knot.
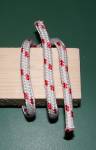
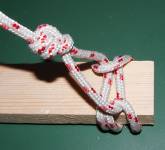
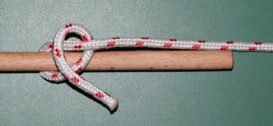
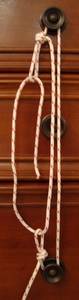
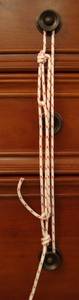
This hitch is useful for hanging a length of wood (such as for making scaffolding, or a wooden swing, etc.).
To tie this knot, wrap the rope around the end of the board as in picture 1. The ends of the rope are very short in picture 1, but this is simply for the purpose of making the picture clearer. Now grab the strand of rope on top of the board which is farthest to the left in picture 1, and bring it to the right over the top of the other two strands of rope, then hook it under the board (picture 2). Picture 3 shows the ends of the rope at a more normal length, and now you can tie off one end of the rope with a Bowline (or some other knot such as a Double Dragon as shown in picture 3).
 -1
-1
 -2
-2
 -3
-3
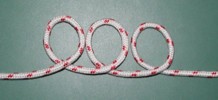
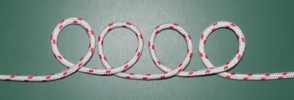
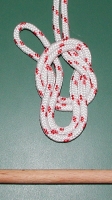
The Sheep Shank can be used to shorten a length of rope, or to isolate a damaged section of rope.
To tie this knot, first make three identical loops (picture 1). If you're trying to strengthen your rope by isolating a damaged section of the rope then the damaged section must be in the middle loop, not the outer two loops. Now reach through the outer two loops and pull the middle loop through the outer loops (picture 2). Tighten by pulling on the ends of the rope (picture 3). The knot will only hold as long as both ends of the rope are putting a strain on the knot. When the strain is released, the knot can easily be shaken apart (which can be handy in certain situations but dangerous in other situations).
 -1
-1
 -2
-2
 -3
-3
A more secure way to isolate a damaged section of rope is by using an Alpine Butterfly.
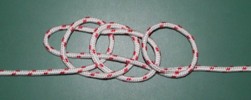
A more decorative version of the Sheep Shank is called the Sheep Shank Man o' War. To tie this knot, first make four identical loops (picture 1). Reach through the two left-most loops and grab the closest part of the third loop (picture 2), then reach through the two right-most loops and grab the closest part of the next loop (picture 3), then pull your hands back out of all of the loops. Pictures 2 and 3 show these actions as two separate steps, but you would actually do them both at the same time. Tighten the knot by pulling on both ends of the rope (picture 4).
 -1
-1
 -2
-2
 -3
-3
 -4
-4
Try taking a close look at the way you tie your shoelaces. You're either tying them as Reef Knots or as Granny Knots, but the Reef Knot will result in a better shoelace knot than the Granny Knot will.
There are numerous interesting variations on the standard shoelace knot at Ian's Shoelace Site.
Many knots can be "slipped," meaning that instead of bringing the end of the rope through the last part of the knot, you actually push a bight (a doubled rope) through instead. This makes it easy to untie the knot by pulling the end of the rope. Notice that the basic Slip Knot (shown in the picture below) is actually a "slipped" Overhand Knot.
See the Reef Knot (above).
Ashley says that this is "much used in handling cargo, for which it is very convenient, as it practically falls apart when pull ceases." (The Ashley Book of Knots, p.290, #1665). This seems to be more of a specialty hitch, which is why I placed it in this section rather than in the section on Hitches. Also see the Killick Hitch (above).
NOTE: For clarity, picture 2 only shows the end of the rope making a single wrap around itself. It's much more secure to make at least three wraps around, as indicated by the arrow in the picture.
 -1
-1
 -2
-2
When you need to lash something down on a car roof, a truck bed, etc., the Trucker's Hitch is a handy way to get extra force for cinching the items down.
After you bring the rope over the top of the items to be lashed down, tie a loop in the rope. An Alpine Butterfly or some other mid-line loop will work fine, but many people use a simple Slip Knot as in picture 1. Pass the end of the rope through a solid feature on your truck, car, etc., then pass it through the loop which you had tied in the rope (picture 1). You now have an improvised pulley system which will multiply the amount of force that you can apply as you tighten down the load. Then tie off the end of the rope with your favorite hitch.
 -1
-1
 -2
-2
 -3
-3
An improved Trucker's Hitch can be made by tying a Slip Knot in a doubled rope (picture 2 above), then passing the end of the rope through a solid feature on your truck (for example), then passing it through the three loops in the doubled Slip Knot (picture 3). Brion Toss refers to this as the Biegner Hitch (The Complete Rigger's Apprentice, p.15).
The Versatackle is similar to the Trucker's Hitch (above), but it has a useful self-locking mechanism.
To tie this knot, first tie two loop knots (such as Alpine Butterflies) as in picture 1. For one of the loop knots (the upper loop knot in picture 1), leave the Working End of the rope fairly long. Bring the long Working End through the other loop knot, then pass it through its own loop knot (picture 2). Bring the long Working End through the other loop knot again (picture 3), then begin tightening the system by pulling hard on the Working End. The self-locking nature of the system will hold the tension as you pull tighter.
 -1
-1
 -2
-2
 -3
-3